In summary:
- Success in the Rockies isn’t just about gear; it’s about understanding the unique environmental pressures like altitude and rapid weather changes.
- Properly assessing your fitness for specific challenges like scrambling versus hiking is the most critical safety decision you’ll make.
- Respecting wildlife protocols and the “alpine clock” by starting early mitigates the two biggest risks: animal encounters and afternoon thunderstorms.
- For advanced adventures, mastering navigation and the competitive Parks Canada permit system is non-negotiable.
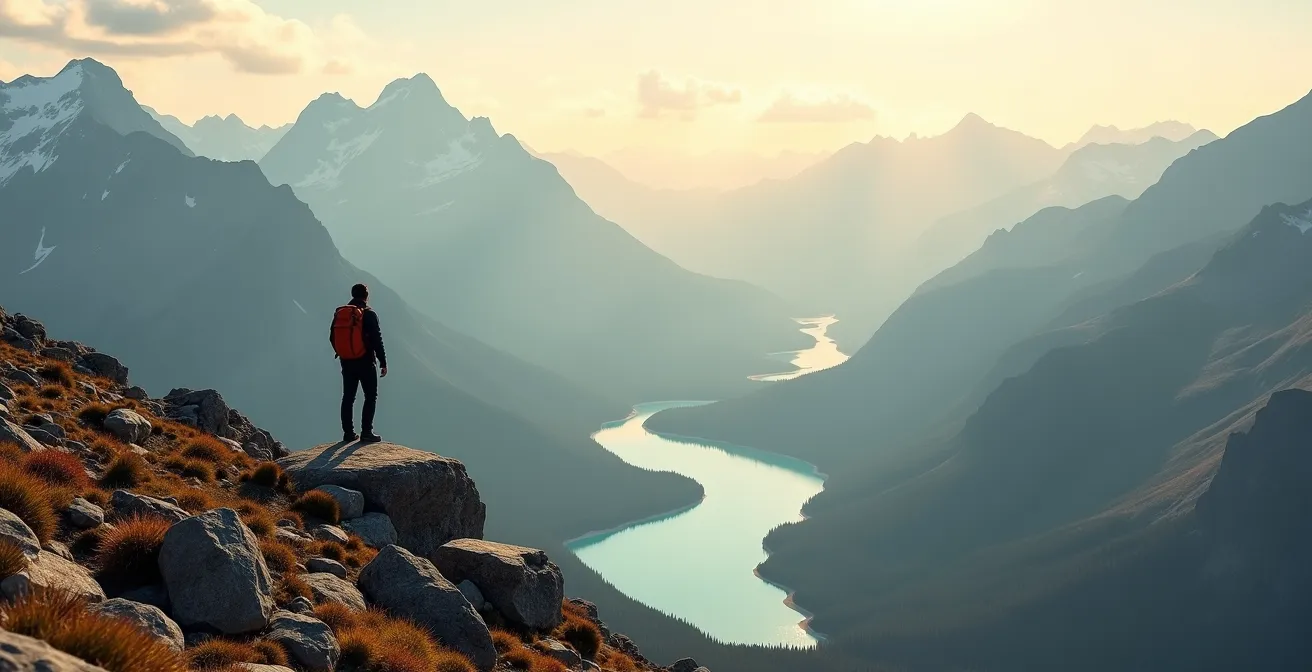
The jagged peaks of the Canadian Rockies promise breathtaking vistas and a profound sense of accomplishment. Every year, thousands are drawn to the iconic trails of Banff, Jasper, and beyond, hoping to stand on a summit and survey the world. But there’s a common misconception that a good pair of boots and a can-do attitude are enough. As a mountain guide, I’ve seen firsthand how this landscape’s beauty masks a set of unique and unforgiving challenges that generic hiking advice simply doesn’t cover.
Many articles will tell you to “pack layers” or “bring bear spray.” While true, this is just scratching the surface. This advice fails to explain the why—the specific environmental pressures of the Rockies that make these rules a matter of survival, not just comfort. It doesn’t address the nuances of high-altitude physiology, the specific behaviour of local wildlife on exposed ridges, or the strategic importance of what time you step onto the trail. True readiness isn’t about the items in your pack; it’s about the knowledge in your head.
What if the key to a safe and successful summit wasn’t just having the right gear, but understanding how to master the alpine environment itself? This guide is built on that principle. We will deconstruct the core challenges of the Rockies, from the invisible threat of altitude sickness at surprisingly low elevations to the complex art of planning a multi-day backcountry expedition. Forget the generic checklists; it’s time to learn how to think like a mountaineer.
To help you navigate these critical topics, this guide is structured to build your knowledge progressively. We’ll start with personal preparation and acclimatization before moving on to understanding terrain, weather, wildlife, and advanced planning for the ultimate wilderness experience.
Summary: Mastering the Challenges of the Canadian Rockies
- Why Altitude Sickness Hits Hikers in the Rockies Below 3000m
- Scrambling vs. Hiking: Which Activity Matches Your Fitness Level?
- The 3 Layers You Must Pack Even for a Summer Mountain Hike
- How to React if You Meet a Mountain Goat or Bighorn Sheep on a Narrow Ridge
- Why Starting Your Hike at 5 AM Changes Everything in the Rockies
- Why You Need Clear Goggles for Kicking Horse’s Flat Light
- Peyto Lake vs. Bow Lake: Where to Stop for the Best Photo?
- Surviving the Backcountry: Planning Multi-Day Wilderness Adventures
Why Altitude Sickness Hits Hikers in the Rockies Below 3000m
One of the most underestimated dangers in the Canadian Rockies is Acute Mountain Sickness (AMS). Many hikers arriving from sea level assume it’s a problem reserved for Himalayan expeditions, but the base elevation of towns like Canmore (1,309m) and Banff (1,383m) already puts your body under strain. The real issue is the rapid ascent to trailheads and summits from there. Your body needs time for physiological adaptation, and ignoring this is a common mistake. Research on high altitude effects shows that up to 75% of people at altitudes above 3,048m (10,000 feet) experience mild symptoms like headaches, nausea, and fatigue. Many popular Rockies hikes easily cross this threshold.
The key isn’t to avoid the peaks, but to ascend intelligently. The “drive high, sleep low” mantra is difficult here, as many visitors stay in high-elevation towns. Therefore, a gradual acclimatization schedule is not a recommendation; it’s a necessity for both safety and enjoyment. Pushing your body too hard, too soon, is a guaranteed way to ruin the first few days of your trip. Listen to your body: dizziness and shortness of breath beyond normal exertion are clear signals to stop, rest, or descend. Remember, the summit will be there tomorrow, but only if you’re healthy enough to attempt it.
Your Acclimatization Action Plan: Arriving via Calgary
- Day 1 (Arrival & Adjustment): Arrive at Calgary Airport (1,100m) and drive to Canmore (1,300m). Limit activity to gentle valley walks, such as along the Bow River pathway. This begins the adjustment process without significant strain.
- Day 2 (Moderate Objective): Attempt a hike with moderate elevation gain, like Grassi Lakes. With a starting elevation of 1,670m and a summit at 1,920m, the 250m gain tests your body’s response.
- Day 3 (Significant Test): If Day 2 went well, try a more significant peak like Ha Ling Peak. The 700m gain from the 1,700m trailhead to the 2,407m summit is a true test of your acclimatization.
- Ongoing Hydration & Avoidance: Throughout your first few days, drink a minimum of 3-4 liters of water daily. It’s crucial to avoid alcohol, especially within the first 48 hours, as it can exacerbate AMS symptoms.
- Day 4+ (Major Objectives): If you feel strong and symptom-free, you are now better prepared to tackle major objectives like Mount Rundle or Cascade Mountain.
Scrambling vs. Hiking: Which Activity Matches Your Fitness Level?
In the Rockies, the line between a steep hike and a “scramble” can be blurry, and misjudging it is a primary cause of mountain rescue calls. A hike primarily involves walking on a trail, even if it’s steep. A scramble, however, involves using your hands for balance and upward movement on rock. It’s the middle ground between hiking and technical rock climbing. Choosing the wrong objective for your skill level can put you in a dangerous situation with high “exposure”—a term for long, unprotected drops where a fall would have severe consequences. An honest self-assessment is your most important piece of gear.
The unofficial bible for this in the region is Alan Kane’s scrambling guide, which classifies routes as easy, moderate, or difficult. This system is the local standard for understanding what you’re getting into. An “easy” scramble might feel like a very difficult hike to a novice, while a “difficult” scramble often requires a helmet and comfort with sustained, exposed climbing moves. Before you attempt any route with “scramble” in the description, you must understand where it falls on this scale and have prior experience on easier, similar terrain. Your fitness for a 10km trail run does not automatically translate to comfort on a narrow, exposed ridge.
To help you choose the right objective, local guidebooks use the Kane Scale. This framework is essential for understanding the technical difficulty and experience required for popular peaks, as this analysis of Rocky Mountain scrambles illustrates.
| Kane Rating | Technical Difficulty | Example Peak | Required Experience |
|---|---|---|---|
| Easy Scramble | Mostly hiking with occasional hand use | Ha Ling Peak | Comfortable on steep trails |
| Moderate Scramble | Frequent hand use, some exposure | Cascade Mountain | Previous scrambling experience |
| Difficult Scramble | Sustained climbing, significant exposure | Mount Temple | Advanced route-finding skills |
The 3 Layers You Must Pack Even for a Summer Mountain Hike
“Pack layers” is the most common piece of mountain advice, but in the Canadian Rockies, it’s an absolute, non-negotiable law of survival due to extreme environmental pressures. It’s not uncommon for a summer day to start near freezing, climb to 25°C in a sunny valley, and then plummet with a sudden hailstorm on an exposed ridge. The goal of layering isn’t just to stay warm; it’s to actively manage your body’s micro-climate by wicking away sweat, insulating against cold, and protecting you from wind and rain.
The system is simple but must be followed precisely. Your three essential layers are:
- The Base Layer: Worn against your skin, its only job is to pull moisture (sweat) away from your body. Materials like merino wool or synthetic polyesters are essential. Cotton is forbidden; it absorbs moisture and will chill you dangerously once you stop moving.
- The Mid-Layer: This is your insulation. A fleece jacket or a light down/synthetic puffy jacket traps your body heat. The thickness depends on the forecast, but it must be in your pack even on a hot day.
- The Shell Layer: This is your armour against the elements. A waterproof and windproof jacket (like Gore-Tex or a similar membrane) is critical. It keeps the wind from stripping away your warmth and the rain from soaking your insulating layers, which would render them useless.
The dramatic temperature drops in alpine environments are a documented reality. As highlighted by official guides to the Canadian Rockies, temperatures can swing wildly, making this three-part system your primary defence against hypothermia, even in July.
As you can see, each layer has a technical purpose. Being able to add or remove these layers to respond to changing conditions and your own exertion level is the core skill of mountain comfort and safety. Never leave a layer behind to save weight.
How to React if You Meet a Mountain Goat or Bighorn Sheep on a Narrow Ridge
Wildlife encounters are a quintessential part of the Rockies experience, but they demand a high degree of situational awareness. While much attention is given to bears, encounters with mountain goats and bighorn sheep on narrow, exposed trails can be equally, if not more, dangerous. These animals are powerful and accustomed to their vertical world. A hiker can be easily knocked off a ledge. The correct response is nuanced and counter-intuitive, and it differs significantly between species. Your goal is always to de-escalate and give the animal a wide berth, even if it means abandoning your summit objective.
For bighorn sheep, the strategy is passive. Avoid direct eye contact, make yourself seem small, and slowly back away, giving them the right of way. They are generally shy and will likely move on if they don’t feel threatened. For mountain goats, a different approach may be needed. They can be more stubborn and sometimes aggressive, especially if they associate humans with salt (from sweat and urine). The key is to be assertive without being aggressive. Stand tall, make noise, and try to encourage them to move, but—and this is critical—always ensure they have a clear escape route. Never corner a goat against a drop-off. The summit is never worth a confrontation.
This difference in approach is a critical piece of local knowledge. As Parks Canada’s official guidelines state, your reaction must be tailored to the specific animal.
Unlike with bears where you should back away, with mountain goats on narrow trails you may need to be assertive to make them move, but never corner them. The summit isn’t worth a confrontation.
– Parks Canada Wildlife Safety Guidelines, Parks Canada Mountain Parks Wildlife Management
Why Starting Your Hike at 5 AM Changes Everything in the Rockies
In the mountains, the clock on your wrist is less important than the alpine clock—the daily cycle of light, weather, and animal activity. An early “alpine start,” typically between 4 and 6 AM, isn’t a preference for hardcore mountaineers; it’s a strategic tool that dramatically increases both your safety and your chance of a magical experience. The most pressing reason is weather. The Rockies are notorious for afternoon thunderstorms that build rapidly and bring lightning, hail, and plummeting temperatures. Being on an exposed summit or ridge after 1 p.m. is a form of calculated risk that often doesn’t pay off. Rocky Mountain safety experts warn that storms and bad weather roll in unexpectedly and quickly in the afternoon at higher elevations. An early start ensures you are up and down from the most exposed sections before this period of peak danger.
Beyond safety, the rewards are aesthetic and spiritual. An early start means you’ll witness the “alpenglow,” a breathtaking phenomenon where the rising sun paints the highest peaks in hues of pink and orange while the valleys are still cloaked in blue shadow. It’s a photographer’s dream and a moment of mountain magic that day-trippers who start at 9 AM will never see. You’ll also enjoy cooler temperatures for the strenuous uphill portion of your hike, firmer snow in the early season, and a much better chance of seeing wildlife, which is most active at dawn and dusk. Finally, you get the popular trails almost to yourself, replacing the sound of crowds with the quiet solitude of the mountains.
The difference is night and day, literally. A 5 AM start transforms a crowded, potentially risky day into a safer, more serene, and unforgettable adventure. It’s the single best change you can make to how you approach hiking in the Rockies.
Why You Need Clear Goggles for Kicking Horse’s Flat Light
While the title mentions a specific ski resort and gear, the underlying principle is a deadly serious one for summer hikers: navigating in a whiteout. Flat light, where clouds and snow or rock blend into a featureless grey world, can disorient even the most experienced hiker in minutes. In the Rockies, a beautiful sunny day can turn into a complete whiteout with the arrival of a single cloud, especially at higher elevations. In these conditions, your sense of direction and distance is gone. A gentle slope can look like a cliff, and a cliff can look like a gentle slope. This is where having the right navigation tools, and the knowledge to use them, becomes a matter of life and death.
Your smartphone with a hiking app is a fantastic tool, but it should never be your only one. In cold weather, batteries die with shocking speed. Above the treeline, GPS signals can become unreliable. This is why a traditional map and compass remain the gold standard. They have no batteries and always work. However, using them effectively in a whiteout requires practice. A satellite-based messenger and GPS device, like a Garmin inReach or a SPOT, provides a crucial layer of safety, allowing you to track your location and, most importantly, send an SOS signal if the worst happens. Relying on a single electronic device for navigation in the backcountry is an unacceptable risk.
When visibility drops to near zero, having a reliable navigation system is paramount. Comparisons of navigation tools for the Rockies show that technology has its limits, especially when you need it most.
| Tool | Reliability in Whiteout | Battery Life | Cost (CAD) |
|---|---|---|---|
| Phone with AllTrails | Poor – loses signal above treeline | 2-4 hours in cold | App: $40/year |
| Map & Compass | Excellent – always works | Unlimited | $50-80 |
| Garmin InReach | Excellent – satellite based | 100+ hours | $500+ device, $15+/month |
| SPOT Device | Good – emergency beacon | 1000+ hours | $200+ device, $12+/month |
Peyto Lake vs. Bow Lake: Where to Stop for the Best Photo?
The Icefields Parkway is a highlight reel of staggering landscapes, and two of its most famous stops are Peyto Lake and Bow Lake. For photographers and sightseers, the question is often which one offers the better experience and photo opportunity. The answer depends entirely on what you’re looking for: an iconic, elevated viewpoint or an immersive, ground-level experience. Understanding the logistics, light, and crowd levels of each is key to making the right choice for your itinerary.
Peyto Lake is famous for its jaw-dropping, wolf-head shape and its otherworldly turquoise colour, which is most vibrant in the midday sun. The classic shot is from a high viewpoint, a short 10-minute walk from the parking lot. This accessibility, however, is its downfall; the main viewing platform is often incredibly crowded with tour buses. For a better shot, take the advice of local photographers: skip the main wooden deck and follow the paved path to the upper viewpoint for a more expansive and less obstructed view.
Bow Lake, on the other hand, offers a completely different perspective. You can walk right to its shore from the parking lot. The real magic here happens at sunrise or sunset, when the calm water perfectly reflects the towering Crowfoot Glacier and Wapta Icefield. While the shoreline is accessible, the best compositions often require a walk along the north shore, putting the glacier in your backdrop. It’s less of a quick “point-and-shoot” stop and more of an opportunity for creative, reflective photography in quieter surroundings.
The choice between these two iconic locations depends on your priorities for time, effort, and photographic style. This photography-focused comparison breaks down the key differences.
| Factor | Peyto Lake | Bow Lake |
|---|---|---|
| Walk from Parking | 10 minutes | 2 minutes to shore, 2 hours to falls |
| Best Light | Midday for turquoise color | Sunrise/sunset for reflections |
| Crowd Level | Very high (tour buses) | Moderate |
| View Type | Elevated wolf-head shaped lake | Shoreline with glacier backdrop |
| Photo Tip | Skip main platform, use upper viewpoint | Walk north shore for Crowfoot Glacier reflections |
Key takeaways
- Acclimatize Intelligently: Altitude sickness is a real threat. A slow, multi-day ascent plan is mandatory for a safe and enjoyable trip.
- Assess, Don’t Assume: Honestly evaluate your fitness and experience against the objective difficulty of a trail, especially when moving from hiking to scrambling.
- Master Your Micro-Climate: The three-layer system (base, mid, shell) isn’t just about warmth; it’s a critical tool for actively managing moisture and protecting against rapid weather changes.
Surviving the Backcountry: Planning Multi-Day Wilderness Adventures
Venturing into the backcountry for a multi-day trip is the ultimate Canadian Rockies experience, offering solitude and access to landscapes few ever see. However, it represents a significant step up in commitment and planning. Here, you are truly on your own. Success requires meticulous preparation far beyond that of a day hike, encompassing a competitive permit system, mandatory safety gear, and a deep respect for the wildness of the environment. There is no room for error when you are days away from the nearest road.
The first hurdle is bureaucracy. The most sought-after backcountry routes, like the Rockwall Trail in Kootenay NP or the Skyline Trail in Jasper NP, require permits that are notoriously difficult to secure. According to data from backcountry trekking experts, popular Parks Canada routes sell out within minutes when reservations open in January. This requires a strategic approach: be online the moment reservations open, have multiple backup routes planned, and be ready to book instantly.
Once you have a permit, safety becomes the priority. This includes carrying and knowing how to use all the gear we’ve discussed, plus specific items for overnight stays. Most critical is bear safety. Between April and November, Parks Canada mandates that all backcountry users in Banff, Yoho, Kootenay, and Jasper carry their food in an approved, bear-resistant container or know how to properly hang a food cache. This is not a suggestion. It is a strict requirement to protect both you and the region’s iconic grizzly and black bear populations. A backcountry trip is a test of self-reliance, and that begins with flawless planning.
To begin planning your own multi-day adventure, your first step is to research the Parks Canada website for reservation dates and trail requirements, and to start building the comprehensive gear list this journey demands.