In summary:
- Successful winter hiking isn’t about piling on clothes; it’s about actively managing your body’s heat and moisture like a furnace.
- Choosing the right traction—microspikes for ice, snowshoes for deep snow—is the first step to efficiency and safety on Canadian trails.
- The “Be Bold, Start Cold” rule is essential: starting your hike feeling slightly cold prevents the dangerous cycle of sweating and freezing.
- Recognizing the early signs of hypothermia (the “umbles”: stumbles, mumbles) in yourself and others is a critical life-saving skill.
- Your summer layering system is the foundation, but a dedicated “puffy” fourth layer for stops is a non-negotiable winter addition.
The pristine silence of a snow-covered forest, the crisp air, the brilliant sun on a frozen landscape—winter hiking in Canada offers a unique magic that summer trails simply can’t match. Yet for many seasoned summer hikers, the thought of venturing out in sub-zero temperatures is intimidating. The gear seems complicated, the dangers more severe. Many guides will tell you to “dress in layers” or “bring the right equipment,” but this advice misses the fundamental point. The true key to unlocking winter is not just about what you carry, but understanding *why* you carry it.
Think of your body as a powerful heat engine. In winter, your primary job isn’t just to pile on insulation; it’s to regulate that engine with precision. Too much work and you overheat, producing sweat. That moisture is your greatest enemy, as it can freeze and lead to rapid heat loss. Too little insulation and the engine sputters, risking hypothermia. This guide is built on that core principle. We will move beyond simple checklists to explore the physics of warmth, the mechanics of traction on snow, and the subtle signs your body gives you when things are going wrong. By mastering these concepts, you’ll gain the confidence to not just survive, but truly thrive on the winter trail.
This comprehensive guide will walk you through the essential skills and knowledge needed to transition safely into the world of winter hiking. From gear choices to emergency awareness, you’ll learn to think like a seasoned winter adventurer.
Summary: Winter Hiking 101: A Guide to Conquering Snowy Trails
- Microspikes vs. Snowshoes: Which One Do You Need for Packed Trails?
- The “Be Bold, Start Cold” Rule: Avoiding Sweat in -20°C Weather
- How to Follow Trail Markers When the Snow is 4 Feet Deep
- Why Your Water Bladder Tube Freezes and How to Prevent It
- The “Umbles”: Spotting the Stumbles and Mumbles of Hypothermia on the Trail
- Why You Should Dress Lighter for Snowshoeing Than for Walking
- The 3 Layers You Must Pack Even for a Summer Mountain Hike
- Snowshoeing for Non-Skiers: How to Enjoy Winter Trails
Microspikes vs. Snowshoes: Which One Do You Need for Packed Trails?
Your first step onto a winter trail begins, quite literally, with your feet. Choosing the wrong traction is not just inefficient; it’s dangerous. The two primary tools for Canadian trails are microspikes and snowshoes, and they are not interchangeable. Microspikes are essentially chains with small spikes that you pull over your boots. They are designed to bite into hard, packed snow and ice, providing superb grip on popular, well-trodden paths like those at Johnston Canyon in Banff. They are your go-to for frozen, slippery surfaces.
Snowshoes, on the other hand, are for flotation. Their purpose is to distribute your weight over a larger surface area to prevent you from sinking into deep, unconsolidated snow. If you’re breaking trail in the Rocky Mountain backcountry after a fresh dump of powder, snowshoes are essential. Using microspikes in deep snow is useless; you’ll just have grippy feet at the bottom of a thigh-deep hole. Conversely, wearing snowshoes on a sheet of ice is clumsy and offers less precise grip than spikes. The key is to assess the trail conditions before you go.
This comparative table gives clear, Canadian-specific examples to guide your decision-making process based on the most likely trail conditions you’ll encounter.
| Trail Condition | Recommended Traction | When to Use |
|---|---|---|
| Packed/Icy Trails | Microspikes | Johnston Canyon Banff, frozen paths |
| Deep Powder (>6 inches) | Snowshoes | Rocky Mountain backcountry, fresh snow |
| Steep Alpine Terrain | Crampons | Athabasca Glacier approach routes |
| Mixed Conditions | Bring Both | Variable mountain trails |
A good rule of thumb is the “sink factor”: if your boot sinks more than a couple of inches into what looks like packed snow, it’s time to switch to snowshoes to conserve energy. For steep, technical ice, a third category, crampons (which are more aggressive than microspikes), becomes necessary, but that is typically for more advanced mountaineering.
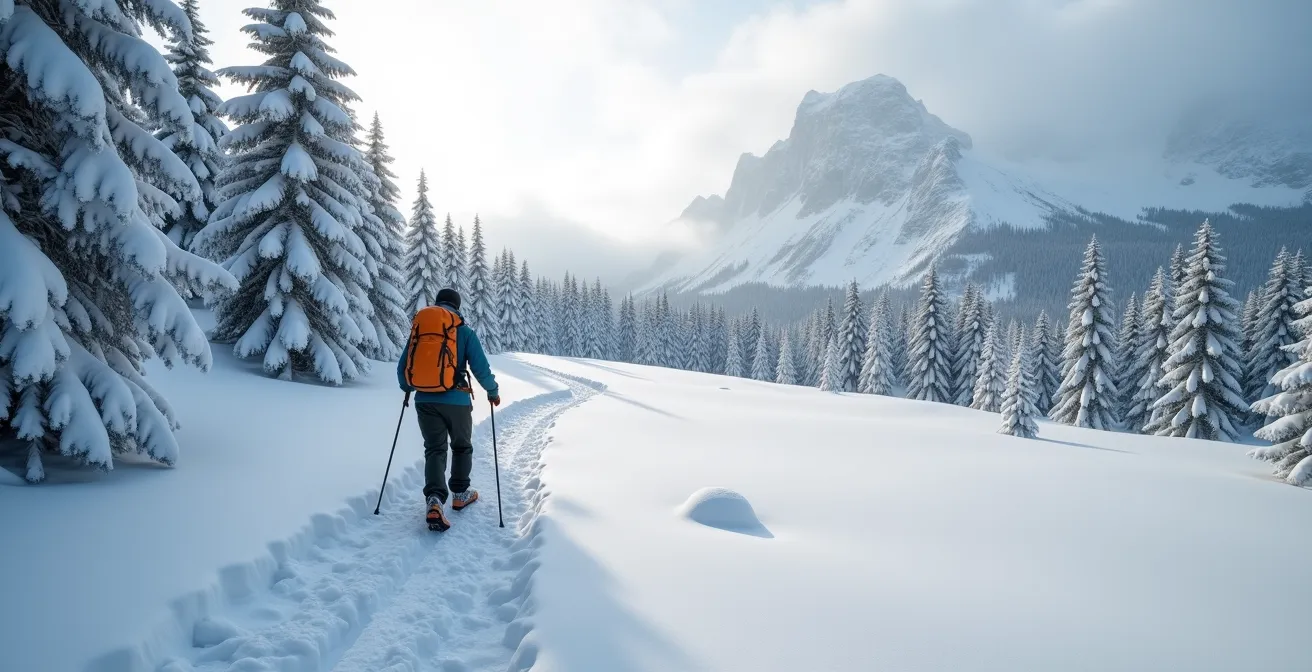
The “Be Bold, Start Cold” Rule: Avoiding Sweat in -20°C Weather
This is perhaps the most counter-intuitive and crucial rule of winter hiking. When you step out of your warm car at the trailhead, your instinct is to be bundled up and cozy. This is a mistake. The first 10-15 minutes of hiking will generate a massive amount of body heat. If you start fully insulated, you will begin to sweat. And sweat is the enemy. It makes your base layers damp, and once you stop moving, that moisture will chill you to the bone. This is because water absorbs body heat 25 times faster than air at the same temperature.
The “Be Bold, Start Cold” philosophy dictates that you should begin your hike feeling slightly underdressed and chilly. You should be uncomfortable for the first five minutes. This discomfort is your assurance that you won’t be a sweaty, freezing mess 30 minutes later. As soon as you start moving, your internal “heat engine” will kick in and you’ll quickly reach a comfortable temperature. It requires discipline and a willingness to trust the process.

The image above perfectly captures this moment of self-regulation. Before even taking a step on the trail, this hiker is making a critical adjustment, trusting that the initial chill is a sign of a successful hike to come. You should constantly be self-regulating. Feeling a bit warm? Unzip your jacket. Starting a steep climb? Consider removing a layer *before* you start to sweat, not after. This proactive moisture management is the true art of staying warm in the cold.
How to Follow Trail Markers When the Snow is 4 Feet Deep
In summer, a trail is a clear path on the ground. In a Canadian winter, the trail is often just a concept buried under feet of snow. The familiar trail markers on trees may be below the snowline, and the shape of the landscape can be completely transformed. This makes navigation a much more serious challenge. Relying solely on your phone’s GPS is a common and dangerous mistake for beginners. As Parks Canada frequently warns, cell service is extremely limited in most mountain parks and remote areas. Your phone can die from the cold, and its GPS may not be reliable without a signal.
The professional approach involves redundancy. You must have a non-digital navigation system. This means carrying a physical map and a compass and, crucially, knowing how to use them. Before you leave, download offline maps for your chosen region onto a dedicated GPS device or a reliable phone app like Gaia GPS or AllTrails (with a Pro subscription for Canadian topographic maps). Always carry a portable power bank to keep your electronics charged, and keep it warm in an inside pocket.
Beyond technology, learn to read the landscape. Often, the most compacted track is the trail, but this can be misleading. Look for other clues:
- Flagging tape on tree branches high above the ground.
- The way trees grow: At the treeline, stunted “krummholz” trees often lean away from the prevailing wind direction.
- Wind-scoured ridges that may have less snow and reveal the summer trail.
- The general direction of a valley or a frozen creek as a reference point on your map.
This multi-faceted approach to navigation—combining modern tech with traditional skills—is your best defense against getting lost when the winter landscape has erased all familiar landmarks.
Why Your Water Bladder Tube Freezes and How to Prevent It
Staying hydrated is just as important in winter as in summer, but it presents a unique challenge: your water freezes. The most common point of failure is the tube and bite valve of a hydration bladder. Even if the water in the reservoir inside your pack stays liquid, the small amount of water left in the exposed tube after you drink can freeze solid in minutes in -20°C weather, rendering your entire water supply useless.
I’ve seen it countless times on the trail: a hiker pulls out their tube for a drink, only to find it’s a solid stick of ice. This is not just an inconvenience; it can be a serious safety issue. As one British Columbia hiker shared about their experience in the Rockies:
I learned the hard way in the Rockies – my hydration tube froze solid at -20°C within 30 minutes. Now I always keep my bite valve tucked in my jacket and use the blow-back method religiously.
– Anonymous, besthikesbc.ca
This experience highlights the most effective prevention technique: the blow-back method. After every single sip, you must forcefully blow the water from the tube back into the reservoir. This leaves the tube empty, with nothing to freeze. Additionally, tuck the bite valve inside your jacket against your body to keep it from freezing between sips. While insulated tubes can help, they are not foolproof in deep cold and are no substitute for the blow-back technique.
Your Action Plan: The Canadian-Proof Hydration System
- Primary System: Use a wide-mouth Nalgene bottle stored inside a wool sock or insulated carrier *inside* your pack, close to your back. The wide mouth is less likely to freeze shut than a narrow one.
- Blow-Back Technique: If using a bladder, forcefully blow all water from the tube back into the reservoir after every sip. No exceptions.
- Tuck the Bite Valve: Keep the bite valve tucked inside your jacket, against your chest, to protect it from the cold and wind between uses.
- Lower the Freezing Point: Add an electrolyte powder to your water. This not only replaces lost salts but also slightly lowers the freezing point of the water.
- Consider Insulation: For temperatures consistently below -15°C, an insulated tube cover can provide an extra layer of protection, but should be used in combination with all other methods.
The “Umbles”: Spotting the Stumbles and Mumbles of Hypothermia on the Trail
Hypothermia is the most insidious danger of winter hiking. It’s a gradual cooling of your body’s core temperature, and its initial signs are often behavioral, not physical. People don’t suddenly start shivering violently; they first become clumsy, confused, and irritable. The danger is that the person experiencing it often doesn’t realize it’s happening. Their judgment is the first thing to go. This is why you must be vigilant in monitoring not just yourself, but everyone in your group. The urgency cannot be overstated; Chilliwack Search and Rescue reported a 50% increase in incident calls during the winter of 2020, many related to exposure.
A simple and effective way to remember the early warning signs is the “Umbles”:
- Stumbles: A normally sure-footed hiker begins to trip or lose their balance. Their coordination degrades.
- Mumbles: Their speech becomes slurred, slow, or they struggle to answer simple questions.
- Fumbles: They start dropping things—poles, a water bottle, their gloves. Fine motor skills deteriorate.
- Grumbles: A sudden, uncharacteristic change in mood. They may become withdrawn, apathetic, or unusually irritable and negative.
If you notice any of the “umbles” in a hiking partner, you must act immediately. Do not ask them if they are cold; they may not be able to assess their own condition. Tell them it’s time to stop for a break. Get them to put on that extra “puffy” layer, give them a warm, sugary drink from a thermos, and offer a high-energy snack. The goal is to stop further heat loss and provide calories for their internal furnace to burn. If their condition doesn’t improve quickly, it’s time to end the hike and head back, or call for help if necessary.
Why You Should Dress Lighter for Snowshoeing Than for Walking
You might assume that any winter activity at -10°C requires the same level of insulation. This is a critical miscalculation in your energy calculus. Snowshoeing is a high-intensity cardiovascular workout. You are not just walking; you are lifting your feet high with an apparatus attached to them and pushing through resistant snow. This effort generates a tremendous amount of body heat. In fact, studies show that snowshoeing burns between 400 to 600 calories per hour with moderate effort—often significantly more than walking or even running the same distance.
What does this mean for your layering? It means you need to dress significantly lighter for a snowshoeing outing than you would for a simple winter walk. If you wear the same insulated parka you’d use for a stroll along the Toronto waterfront to go snowshoeing in Gatineau Park, you will be drenched in sweat within 20 minutes. This brings us back to our core principle: moisture management. You must dress for the activity you are *doing*, anticipating the heat your body will generate.
This table provides a practical comparison of how you might adjust your layering system based on your activity level at the same outdoor temperature.
| Activity | Base Layer | Mid Layer | Outer Layer |
|---|---|---|---|
| Toronto Waterfront Walk | Merino wool thermal | Fleece pullover | Insulated parka |
| Gatineau Park Snowshoe | Lightweight synthetic | Thin fleece vest | Shell jacket (vented) |
Notice the dramatic difference in the mid and outer layers. For the high-output activity, the heavy insulation is replaced by a highly breathable shell jacket, likely with pit zips wide open to vent heat. The key is to have the heavy insulated “puffy” jacket in your pack, ready to be put on the second you stop for a break.
Key Takeaways
- Your summer 3-layer system is the foundation, but a fourth “puffy” layer for static warmth is essential in winter.
- “Cotton Kills” is not a myth. It absorbs moisture and catastrophically accelerates heat loss, making it the most dangerous fabric for winter activities.
- Proactive ventilation is crucial. Use jacket zippers and vents to release heat *before* you start to sweat, not after.
The 3 Layers You Must Pack Even for a Summer Mountain Hike
The layering system is the cornerstone of outdoor clothing, and its principles are even more critical in winter. While the title says three layers, for Canadian winters, you should really think of it as a 3+1 system. The first three layers are for when you are moving; the “+1” is your emergency warmth for when you stop. Let’s break it down.
First, a foundational rule: avoid cotton at all costs. The phrase “cotton kills” is not an exaggeration in the Canadian mountains. Cotton absorbs a huge amount of water (from sweat or snow) and loses all its insulating properties, actively pulling heat from your body. A sweat-soaked cotton t-shirt at -15°C in the Rockies can be a fast track to hypothermia. Always choose synthetics or merino wool.
Here is the ideal four-layer system for Canadian winter hiking:
- The ‘Second Skin’ (Base Layer): This layer sits directly against your skin. Its only job is to wick moisture away. Look for lightweight merino wool or synthetic fabrics (polyester, polypropylene).
- The ‘Furnace’ (Mid-Layer): This is your primary insulation layer. Its job is to trap warm air. Fleece, down vests, or wool sweaters are excellent choices. The thickness will vary depending on the temperature and your activity level.
- The ‘Fortress’ (Shell Layer): This is your protection from the elements. It must be windproof and waterproof (or highly water-resistant) but also breathable. A non-breathable shell will trap moisture from your sweat, defeating the purpose of the system.
- The ‘+1 Puffy’ (Static Insulation): This is a thick, highly insulated jacket (down or synthetic) that lives in your pack while you are moving. The moment you stop for more than a minute, you put this on over everything else to trap all your generated heat. Taking it off again signals it’s time to start moving.
This system gives you ultimate versatility. By adding, removing, or venting these layers, you can precisely control your body’s temperature and stay dry, which is the ultimate key to staying warm.
Snowshoeing for Non-Skiers: How to Enjoy Winter Trails
For those who don’t ski, snowshoeing is the most accessible and rewarding way to explore Canada’s winter wonderland. Modern snowshoes are lightweight, easy to use, and open up a world of trails that are impassable with boots alone. If you can walk, you can snowshoe. However, a few basic techniques will make your first outings much more efficient and enjoyable.
Walking in snowshoes requires a slightly wider stance than normal to avoid stepping on your own snowshoe frames. The most important features on modern snowshoes are the toe crampons under the ball of your foot, which provide uphill traction. When going up a slope, you need to kick your toes in firmly to engage these crampons, leaning your body weight forward into the hill. When going downhill, keep your knees bent and your weight slightly back, letting the tail of the snowshoe drag a bit for stability.
Beyond movement, trail etiquette is crucial. Many winter trails are shared-use. You must never walk on groomed cross-country ski tracks. These parallel grooves are painstakingly set by groomers for skiers. Walking on them with snowshoes ruins them. Always walk alongside the tracks. Finally, a key energy-saving technique for long ascents is the “rest step,” where you briefly lock your back knee at the end of each step, allowing your skeletal structure to take the weight for a split second, giving your muscles a micro-rest.
For your first time, choose a well-marked, popular trail. Many provincial and national parks offer excellent beginner-friendly routes and even have rental facilities. Locations like Arrowhead Provincial Park in Ontario or Mount Seymour in British Columbia are perfect gateways, offering the beauty of the backcountry with a greater safety margin. This allows you to focus on getting comfortable with the gear and your layering system.
Now that you understand the principles of managing your personal “heat engine,” the next step is to put them into practice. Start with a short, familiar trail on a clear day to test your systems and build confidence before tackling more ambitious winter objectives.